Author Topic: Detailed Webcam / Enclosure Tour....  (Read 4460 times)

0 Members and 1 Guest are viewing this topic.

Offline GregJ

  • Forecaster
  • *****
  • Posts: 946
    • http://www.SkunkBayWeather.com
Detailed Webcam / Enclosure Tour....
« on: June 02, 2013, 01:27:02 PM »
I recently received a pm requesting more information about my webcam set up.  Particularly what my cam enclosure looks like, what kind of pan/tilts, etc…  A while ago I committed to doing this and got lazy… #-o  So, I took the time this morning to put it together.

First, here is a picture of my enclosure.
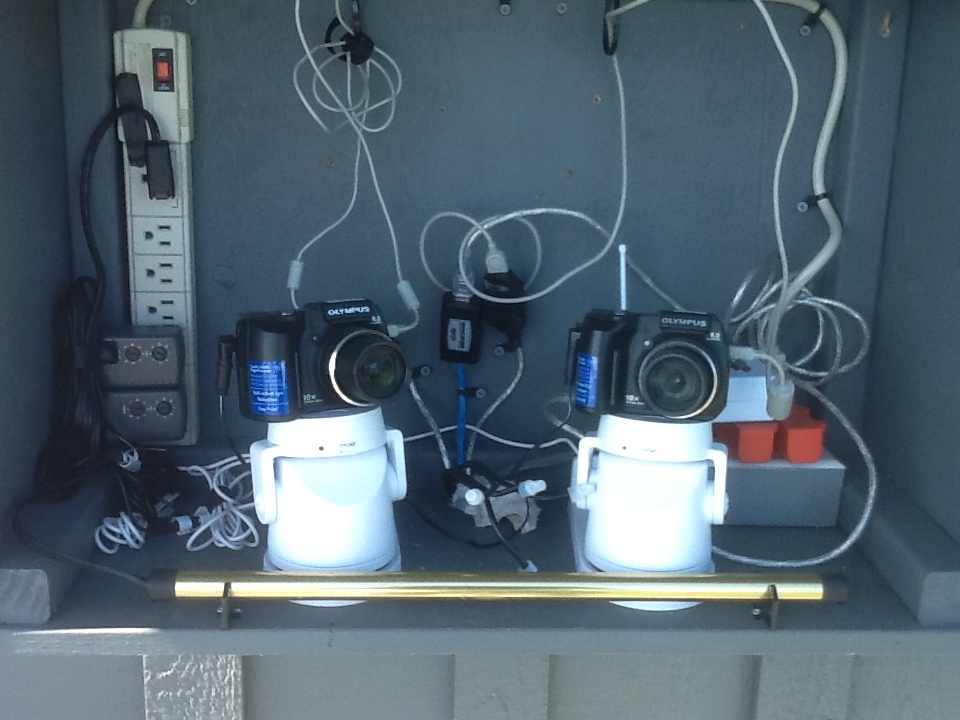
 
Starting left to right… the power into the enclosure is a UPS protected power supply.  On power outages, the pan/tilts will center, which blows all the work you did to line up the images….  
The two black things plugged into the surge protector are the controller for each pan/tilt.  They receive a signal from the main controller that is connected by USB to my main computer at the other end of the house.  I am using 100ft of Cat5e and a USB extender to get to the CM15a main controller.  

Here is a close-up of the CM15A controller:

 
The X10 package is called Active Home Pro.  You can control many devices with this package.  The signal is transmitted through the house wiring.  This is old technology that was developed before the average household had the vast array of electronics that we enjoy today.  Unfortunately all these electronics create noise, which conflicts with these signals.  I only had success when I had the devices plugged into the same outlet.  UPS’s are one of the worst culprits.  I stopped counting after 6 UPS’s….
 
The pan/tilts are called X10 Ninjas.  They are out of production, but there are still some new ones available on Ebay.  They are made specifically for security cams, so there is a minor retro-fit involved.
 
The gold thing in front of the cams is called a goldenrod.  It is an 11 watt heater made for marine use.  This keeps the enclosure dry.  We are on the water in Puget Sound with very high humidity and lots of dew.   This seems to work quite well.  

The cams are Olympus SP500’s and work with Sebectec software.   They are each connected to old Dell laptops by USB (in my closet right behind the enclosure).  There is a USB relay switch installed between the cam and the computers.  This switch monitors the USB port and resets the cam if it senses a drop in signal.  I have virtually 100% uptime with this switch.  It is connected to 12 volt power supplies that power each camera.  USB is notorious for going into la-la land when under 24/7 use.  This switch is manufactured by Mike at Sebectec.  

Here is a picture of the outside of the enclosure.  
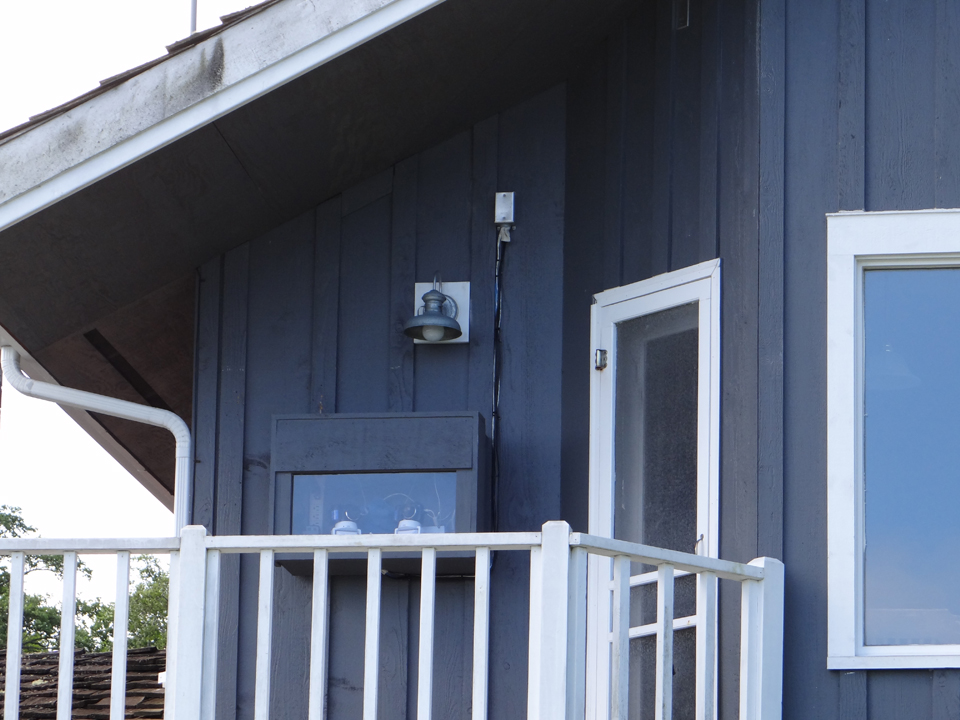

(Dang... This really shows how bad I have to paint my house.... :oops:)  You can see I have it mounted under a large overhang which helps keep the window of the enclosure somewhat dry.  I have used single pane glass, double pane glass and Plexiglas in enclosures over the years.  Right now I have Plexiglas.  I think the best is single pane glass.  The only reason I don’t have that now is because I broke 2 panes ](*,) and got impatient so I installed some Plexiglas I had out in the shop.

In order I would say:
1 Single pane glass
2 Plexiglas - scratches easily and Rainx won't work on it.
3 Double pane glass – I got some refractory distortion going through two panes.

I think that about covers it.  Hope this is helpful.

Greg
  

« Last Edit: June 02, 2013, 01:39:52 PM by GregJ »
Davis VP2 with VWS

"Everybody talks about the weather, but nobody does anything about it." -- Mark Twain

Offline smorris

  • WxElement panel
  • Forecaster
  • *****
  • Posts: 568
    • Long Road Station
Re: Detailed Webcam / Enclosure Tour....
« Reply #1 on: June 02, 2013, 05:49:37 PM »
Thank you very much, Greg! That wasn't at all what I was expecting for an enclosure. I figured you had one of the aluminum box things. I've got an email into Mike to see if he's had anyone run SebecTec under Parallels on a Mac, and if there's any problems. I think there's an X10 module for Mac, so I could control the camera from my main desktop.

Thanks so much! I may have additional questions as I look into this further,
Steve
Steve - Avon, Ohio
Davis Vantage Pro2 Plus w/FARS, Leaf & Soil Station

CWOP • WU • AWEKAS • CoCoRaHS • Skywarn • MWWN • UK Met • PWS • WeatherBug • Twitter • Facebook

Offline GregJ

  • Forecaster
  • *****
  • Posts: 946
    • http://www.SkunkBayWeather.com
Re: Detailed Webcam / Enclosure Tour....
« Reply #2 on: June 02, 2013, 07:16:28 PM »
Your welcome Steve.  As far as the enclosure.... That is my 3rd one.  I keep growing out of them.... :roll:  Ya picture this stuff in your head and it doesn't seem that big.  Then when you start filling them up with equipment, you run out of room fast.  I thought I made this one WAY oversized and the reality is, it's still pretty tight.  Just the swing on the cams require additional room for the cables so they have a lot of free play.  Otherwise it affects the accuracy of the movement.

Greg

Davis VP2 with VWS

"Everybody talks about the weather, but nobody does anything about it." -- Mark Twain

Offline smorris

  • WxElement panel
  • Forecaster
  • *****
  • Posts: 568
    • Long Road Station
Re: Detailed Webcam / Enclosure Tour....
« Reply #3 on: June 03, 2013, 12:13:00 PM »
Well, that didn't take long.... I won an Olympus SP-500 UZ on eBay this morning for $92.30. I hope it wasn't someone here I outbid. ;)

Looking through Greg's photos, description, and reading about the components availability, I think I have an understanding of how things work. The camera is connected to the computer via USB through some sort of switch that detects connectivity, and somehow reboots the camera if needed. I don't see a power supply in the photo, but I assume the camera needs one. There's not a power supply included in the cameras I found on eBay.

The X10 pan/tilt base is powered by the power supply on the left with the channel selector. I think you're saying the pan/tilt base talks to the CM15a controller shown behind the bases. You've mounted it there to avoid radio interference, and then hard-wired it back to your computer via Cat 5. What happens at the other end? Are you controlling the pan/tilt from the SebecTec software? I found a couple of X10 Ninja bases available in the $125-150 range. I also found several cheapo pan/tilt bases with remote control, but that wouldn't connect to the computer.

Am I understanding how these work correctly? I'll probably get the camera working before I mess with and spend anything on a base or enclosure. I'm hoping I don't run into any problems running SebecTec on Win XP on my Mac under Parallels. I haven't tried running any USB device on Windows before, so I'll see how that works first.

Thanks for any clarification or suggestions,
Steve
Steve - Avon, Ohio
Davis Vantage Pro2 Plus w/FARS, Leaf & Soil Station

CWOP • WU • AWEKAS • CoCoRaHS • Skywarn • MWWN • UK Met • PWS • WeatherBug • Twitter • Facebook

Offline GregJ

  • Forecaster
  • *****
  • Posts: 946
    • http://www.SkunkBayWeather.com
Re: Detailed Webcam / Enclosure Tour....
« Reply #4 on: June 03, 2013, 04:29:29 PM »
All good questions Steve.  I'll try to answer them in order.  You will need 2 things if they don't come with the camera.  You'll need a USB cable.  I have gotten them from Amazon for cheap.  I have also bought cams that included the cable.  So, no need to buy unless you know for sure that it didn't come with the cam.  I have been getting my power supplies at Walmart.  They have a universal supply for about $15.  BTW, I am typing this on my IPad... I'd provide links, but I have screwed them up before on this thing..... :oops:   The relay switch is bought through Mike at Sebectec.  You don't see either of those in the enclosure because they have to be right next to the PC.  You may want to try your system before buying the switch.  Some PC's seem to not need it.  The shorter the cable the better.  The Ninja pan/tilt should come with a remote control.  If you are close to the pan/tilt, the remote actually works quite well.  The are RF instead of infrared, so the range is good.  I bought the USB solution so I could control it remotely.  I get requests from the media occasionally to point my cam at something interesting.  It's nice to have this remote control.  There is a piece of software called Ihome that is required to make it all work.  Because this is not the typical installation for this, customer support was useless.  They couldn't understand what I was doing.  If you decide to go this route, let me know and I can point you to exactly what you need.  It took me a long time to figure out exactly what I needed.

So, long winded answer to you questions, but my recommendation is to start with the basics and add as you become comfortable with everything.  The basics would be just the USB cable and power supply. Oh, one more thing, you will need to do a firmware update on the cam when you receive it.  There is a document on the Sebectec site that will walk you through it.

There is a bit of a learning curve with this, but that is only because there are so many features available.  Keep us informed on how this goes and I'll be glad to help when I can.  Mike watches this forum too, so I wouldn't be surprised to see him chime in if I give you bad advice.... :lol:

Greg
Davis VP2 with VWS

"Everybody talks about the weather, but nobody does anything about it." -- Mark Twain

Offline smorris

  • WxElement panel
  • Forecaster
  • *****
  • Posts: 568
    • Long Road Station
Re: Detailed Webcam / Enclosure Tour....
« Reply #5 on: June 03, 2013, 06:26:12 PM »
Thank you for all the details, Greg! If I end up going the X10 route, I may need further information. Like I said earlier, I want to make sure I can get the camera and SebecTec software running on my Windows partition, first. (I had not launched Windows XP Pro for about six months, and have had several restarts today as I download and install the dozens of updates!)

The camera I bought does have the USB cable, all the software and documentation. I'll just need to get a power supply (unless one of the several I already have fits.) It looks like all I need is a 6V 4.8mm AC adapter.

Thanks again,
Steve
Steve - Avon, Ohio
Davis Vantage Pro2 Plus w/FARS, Leaf & Soil Station

CWOP • WU • AWEKAS • CoCoRaHS • Skywarn • MWWN • UK Met • PWS • WeatherBug • Twitter • Facebook

Offline GregJ

  • Forecaster
  • *****
  • Posts: 946
    • http://www.SkunkBayWeather.com
Re: Detailed Webcam / Enclosure Tour....
« Reply #6 on: June 03, 2013, 07:10:25 PM »
Sounds like you're almost there.  If your Mac solution doesn't work, Sebectec can run on old, cheap XP machines quite well.  Both my cams are running on 6-7 year old laptops.  Now that I am on a real computer...  :lol:  Here is a link to the power supply that I use:  http://www.walmart.com/ip/PowerLine-1300-mah-Universal-AC-Adapter-w-USB-Power-Port/16778839?tv2=true&

Greg
Davis VP2 with VWS

"Everybody talks about the weather, but nobody does anything about it." -- Mark Twain

Offline sebeclake

  • Senior Contributor
  • ****
  • Posts: 192
Re: Detailed Webcam / Enclosure Tour....
« Reply #7 on: June 03, 2013, 09:06:26 PM »
So SebecTec can run a camera on a Mac using Virtual Machine Win XP, is that right?

Regarding remote pan/tilt - I was thinking of mounting an Olympus SP-500UZ on the top of my Foscam pan/tilt camera.  Then I could access it from a browser to point both cameras and have a video feed at the same time as the HD snapshots.  Crazy idea?

-Mike

Offline WeatherHost

  • Forecaster
  • *****
  • Posts: 3649
Re: Detailed Webcam / Enclosure Tour....
« Reply #8 on: June 03, 2013, 09:15:40 PM »
I'm not sure how you would do that mechanically so it would be secure and I'm not sure the Foscam motors and gearing would handle any additional load/weight.


Offline smorris

  • WxElement panel
  • Forecaster
  • *****
  • Posts: 568
    • Long Road Station
Re: Detailed Webcam / Enclosure Tour....
« Reply #9 on: June 03, 2013, 09:25:57 PM »
So SebecTec can run a camera on a Mac using Virtual Machine Win XP, is that right?
-Mike

That's my plan. The camera should arrive in a few days, but today I did the Windows updates and installed your software. It launched fine, and is running in the background now. I've set up the details for my CWOP and WU weather data and the FTP path and passwords. Of course it isn't processing anything, as I don't have the camera yet.  I'll update this once I get the camera and some results.

One thing I need to figure out is how to keep Windows from going back to the user login screen when the Virtual Machine hasn't been the active screen for a while. Parallels and the Windows virtual machine are consuming about 1.5 GB of RAM, which isn't a problem on this 16 GB iMac. But I can see a huge increase in CPU use, which I'll keep an eye on.

Steve
Steve - Avon, Ohio
Davis Vantage Pro2 Plus w/FARS, Leaf & Soil Station

CWOP • WU • AWEKAS • CoCoRaHS • Skywarn • MWWN • UK Met • PWS • WeatherBug • Twitter • Facebook

Offline C5250

  • Forecaster
  • *****
  • Posts: 840
    • Local weather
Re: Detailed Webcam / Enclosure Tour....
« Reply #10 on: June 03, 2013, 11:11:49 PM »
Nice setup!

Rather than glass or pexiglas, I would suggest trying Lucite; it has the impact resistance of pexi, but isn't scratched nearly as easily as pexi.
Precious little in your life is yours by right and won without a fight.

Offline GregJ

  • Forecaster
  • *****
  • Posts: 946
    • http://www.SkunkBayWeather.com
Re: Detailed Webcam / Enclosure Tour....
« Reply #11 on: June 04, 2013, 01:44:44 PM »
C5250,
Thanks for the heads up on the Lucite.  I did a little research on it this morning and it looks interesting.  Do you know if there is a RainX or equivalent that works on it without damage?

Greg
Davis VP2 with VWS

"Everybody talks about the weather, but nobody does anything about it." -- Mark Twain

Offline C5250

  • Forecaster
  • *****
  • Posts: 840
    • Local weather
Re: Detailed Webcam / Enclosure Tour....
« Reply #12 on: June 05, 2013, 10:46:27 PM »
Nothing that I know of. I do recall our silkscreener where I use to work had to do some special steps to get paint to stick to it though.
Precious little in your life is yours by right and won without a fight.

Offline smorris

  • WxElement panel
  • Forecaster
  • *****
  • Posts: 568
    • Long Road Station
Re: Detailed Webcam / Enclosure Tour....
« Reply #13 on: June 06, 2013, 05:53:59 PM »
My eBay camera just arrived! It is smaller than I though it was going to be. I expected about the size of my daughter's Nikon D3100. This will be even easier to build an enclosure around. I haven't looked to see if my power supplies fit yet, nor if it connects to EvoCam or SebecTec. It does have a charged battery and card in it, so I at least know that it seems to work OK.

Steve
Steve - Avon, Ohio
Davis Vantage Pro2 Plus w/FARS, Leaf & Soil Station

CWOP • WU • AWEKAS • CoCoRaHS • Skywarn • MWWN • UK Met • PWS • WeatherBug • Twitter • Facebook

Offline sebeclake

  • Senior Contributor
  • ****
  • Posts: 192
Re: Detailed Webcam / Enclosure Tour....
« Reply #14 on: June 06, 2013, 06:33:07 PM »
Steve, when you run the camera remote control don't use the memory card - let it use internal memory (the card will fail after some time).  Also, set the mode dial to auto.  My enclosure is a 6x6x4" NEMA box from Home Depot.

-Mike


anything