I wanted a wireless connection to my server from the VP2, so I came up with a much easier and more elegant way to achieve connection/logging. Note that unless you are savvy with electronics and soldering you could DESTROY your expensive console!
Why Bluetooth? In my situation it would be difficult to get wires from my server which is recording the weather (using WeeWx) to the VP2 for direct connect serial, and I risk ESD/RFI damage/interference to the server because of the galvanic connection.
The advantage of Bluetooth is obviously it's wireless, but it also prevents any RF noise or ESD from travelling to/from your server and the Davis console. This is especially an important issue if you happen to have a wired weather station! (as I do) If lightning or ESD ever hits your station hardware, then you could also expose your server to it in a hardwired configuration. It also gets around the problem of USB serial adapters that like to reset themselves.
Ok, now for the Meat:
NOTE: Davis has attempted to disable homebrew loggers such as this one starting with version 3.0 firmware. If you have 3.0 or greater firmware on your console, you will first need to program your flash chip using Watson's authentication algorithm found here:
http://www.wxforum.net/index.php?topic=18110.msg200376#msg200376 If you don't, none of this will work!
Davis must have considered building a model with internal flash logging, as there is an unpopulated location for a SPI serial flash memory next to the micro. To get logging on the cheap, You can actually solder an Atmel AT45DB011D-SH-B (wide body) Flash right into the VP2. (Part source link below) All but one pin is correct pin for pad. The pin difference allows the microcontroller to address the internal as well as the external flash as a separate units. Here's an image:
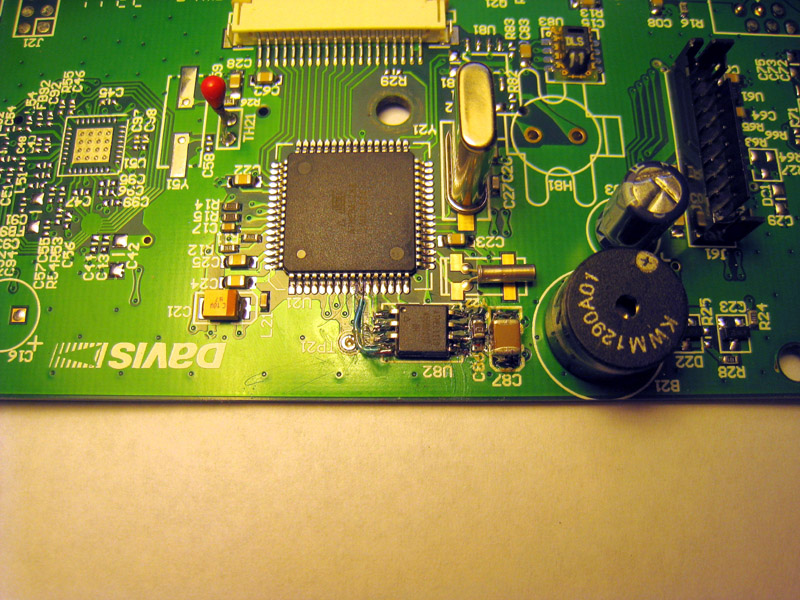
Before soldering the flash, bend up pin 4 (CS) so that it wont touch the PCB and don't solder that to the board pad. Then, after soldering the other 7 pins, run a jumper from pin 4 to the SS (pin 1) header, or you can "cheat" as shown above if you have good soldering skills, and go directly to the micro. Add a .1uf and a 4.7uF cap in the 2 locations next to the flash. (Though it will probably be fine with just the .1uf.) Don't bother trying with pin 4 connected to the pad, as it's not the correct chip select. Reset is also different, but works correctly as-is.
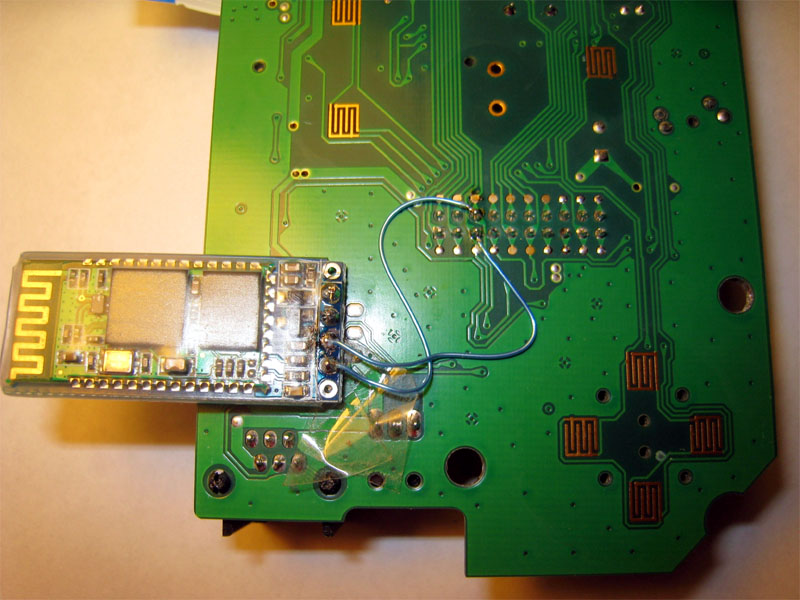
Then to round out an elegant hack, instead of a wired serial connection, simply purchase a bluetooth serial module (available cheap on ebay) and install it inside:
I first had to connect a USB to TTL converter up to the bluetooth module in order to configure it for 19200 baud, I also renamed it "WeatherStation" and changed the PIN. Fire up your favorite serial terminal program (I used minicom) and configure your port for 9600,8,N,1. If you type "AT", (case sensitive, no return needed) you should get an "OK". If not, try reversing the TX/RX. Once you have the OK, you can change the parameters. I found it only works if you type fast, so I simply cut and pasted in the following commands:
AT+NAMEWeatherStation
AT+PIN0000
AT+BAUD5
The module will respond after each command. After the last baud command, the baud rate changes, so you lose communication with it, but that's ok, We're done!
Note: If you don't have/don't want to get a USB TTL cable, you can probably just skip all of that terminal stuff and just reconfigure your VP2 to 9600 Baud (the default for the Bluetooth adapter). The Pin defaults to 1234.
I then positioned the Bluetooth module where the antenna wouldn't be blocked, and it where it would fit without interference inside the housing. Luckily, there are unused pads for an RJ-11 jack that contain 5v power and ground, so I soldered 2 pieces of stiff wire through to corresponding pins on the module. The clear tape is layered over the other pins so the data lines will not short. Since the bluetooth module is expecting 3.3v TTL, this is a perfect match with the VP2's micro!
Once you get everything soldered up, test it by first powering up your VP2, exit setup by holding "done", then execute a "clear all" by making sure wind speed is showing and pressing 2nd then holding "clear" for 6 seconds until "clearing now" is displayed. Then be sure to set your Baud to 9600 unless you have adjusted the bluetooth module baud to 19200. (Go back into setup and scroll to step 14) Start the test by creating a serial link over bluetooth with your favorite terminal program. If you are successful you will get "TEST" echoed back to you if you type it. (Case sensitive) I then set up logging by typing the "SETPER 5" command (set up 5 minute intervals) and then the "START" command.
Voila! Wireless link to your PC or server! I used the open-source (free) software called WEEWX to create web pages and upload my weather data. It will even run on a $35 raspberry pi!
Be sure to get the widebody variant of the Atmel flash, otherwise it will not fit the pads in the VP2. Here for less than $1:
http://www.digikey.com/product-detail/en/AT45DB011D-SH-B/AT45DB011D-SH-B-ND/1886154Here's a California supplier for the Bluetooth Module ($14):
http://www.ebay.com/itm/140830930279(You can get them from China much cheaper, but it will take longer)
I have mine up and running with WeeWx and it works great! If you don't have bluetooth on the PC or server you want to install your weather logger software on, you can buy a USB dongle for low cost. If you need long range, get a class 1 radio.
Enjoy!


